Static Runners
Setting Up Static Runners
In order to fully take advantage of CI, at some point you are going to need to set up a runner. Static Runners are an easy starting point. This is a machine (VM or physical) that is constantly running. Your jobs run directly on this machine. This makes for easy setup and troubleshooting.
For CI, I typically use GitLab, so these instructions are tailored to GitLab (I'll also include some info for GitHub users). On my blog I have a few posts about setting up GitLab Runners. It's spread over a few articles and a little disjointed. I'll attempt summarize it all in one place here. If you prefer video I have a video of me walking Casey through the process. It was made before this tutorial so it might not match up exactly.
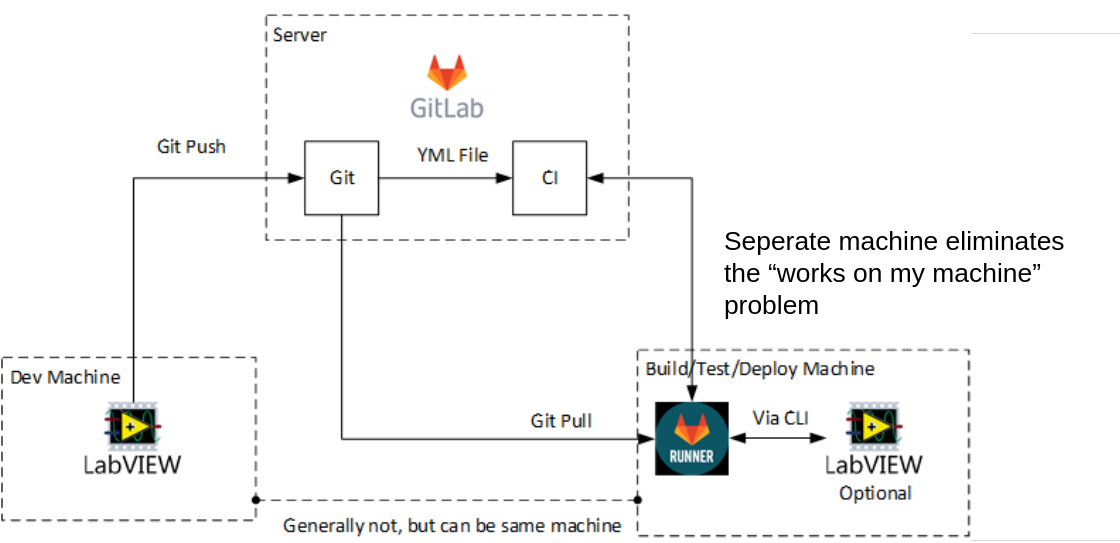
Here is a diagram showing the basic setup.
How Many Runners Do I Need?
This is a common question. It is possible to have a single runner with multiple versions of LabVIEW installed. In the past multiple versions of LabVIEW have not always played well together so I recommend against this. I recommend one runner per version of LabVIEW or one per project if your projects have 3rd party drivers or other unique requirements. This keeps things better isolated. This can result in a lot of machines, so Virtual Machines are your friends here or Docker if you are brave, but that is a whole other can of worms. You can save yourself a little trouble by having a common Win10 or W11 machine that you copy as a starting point. You probably don't want to clone it - that can cause some problems. Better to just copy the VM Disk and create a new VM from it.
Assumptions
I'm making a few assumptions here. I am assuming you are using Windows (it should be similar for Win10 or Win11). I'm also going to be setting this up to use Git Bash instead of Powershell. I detest Microsoft and I don't know Powershell, but I do know Bash, so that is what I am going to use. If you want to use Powershell, the initial setup will be a little easier (because that is the default for GitLab shell runners on Windows). However you may have to tweak some of the yaml files and scripts. I am also assuming that you are using VIPM pro or the Community Edition. You need one of those in order for the vipc applier tool to work.
Starting Point
As a runner you will generally want a seperate machine from your dev machine. This could be a spare laptop or desktop, a VM running on your own desktop or server or a VPS running on something like Amazon, Vultr, or Digital Ocean. You'll need just enough horsepower to load your project and run a build. It will need access out to the internet to be able to ping gitlab.com (or if you are self-hosting, then whatever your url is for your GitLab server). You should consider keeping it on a seperate network isolated from your main network, because running a build basically opens up a reverse shell.
NOTE: If you are just starting out and dabbling with CI, an easy solution is to install GitLab Runner on your Development machine. It is much less than ideal, but lowers the barrier to entry and allows you to easily see what is going on. In that case you can probably skip the section on setting the script to run on startup and setting up autologon.
Access to Runner Machine
You will want to be able to logon to the runner and view the GUI for setup/installation and troubleshooting. For a physical machine that should be easy. RDP works best for remote machines, but VNC, MSP360 or Team Viewer will also work. Don't expose RDP or VNC to the internet. It is not secure. Run it through some encrypted tunnel like ssh, a vpn, wireguard, Nebula, etc.
Initial Software Installation
I'm assuming you are using Windows, so you will want to install the appropriate Windows Version and turn on Remote Desktop (if that is what you are using for access) You will want to install Git For Windows along with Git Bash. The default options should be fine. You will want to install NIPM and use that to install the proper version of LabVIEW, VIPM, DAQmx and any other drivers you need. You'll also want to install some basic VIPM packages such as G-CLI and the VIPM API. You'll also want to install whatever of the SAS-GCLI tools you want to use. If you have the Pro or Community edition of VIPM, then you can use the vipc applier tool to install packages as part of your CI pipeline. If you aren't doing that, then you should probably install the needed packages now. If you are using Python to run any build scripts or utilities, now is a good time to install that and any needed Python packages as well.
You really don't want to install a lot of extras. You are not going to be using this machine for anything other than running builds. Running a build basically opens up a reverse shell, so you don't want anything sensitive on there other than your code.
Initial Verification
You should manually open VIPM and LabVIEW and make sure no licensing dialogs pop up and take care of them if they do. You should verify that VIPM can connect to your version of LabVIEW by opening VIPM and going to the settings dialog box. You should also verify G-CLI is installed correctly and can connect to LabVIEW by typing g-cli echo -- "Hello World" into Git Bash and verifying that it returns "Hello World". If it doesn't, check your $PATH and make sure it contains the G-CLI directory. You may need to add an export line to your .bashrc file.
Setting Up GitLab Runner
Installing GitLab Runner
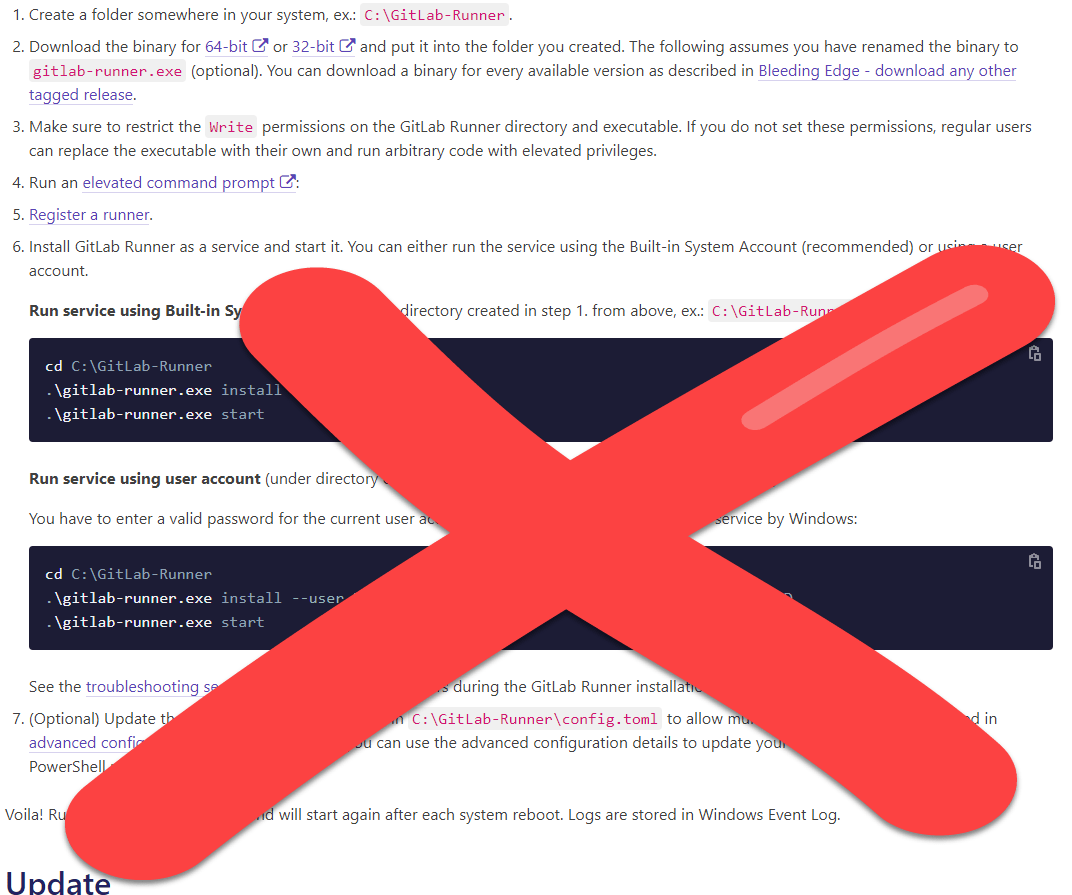
The instructions for installing the gitlab-runner program provided by GitLab are pretty good. Follow the first 3 steps.
THEN STOP!
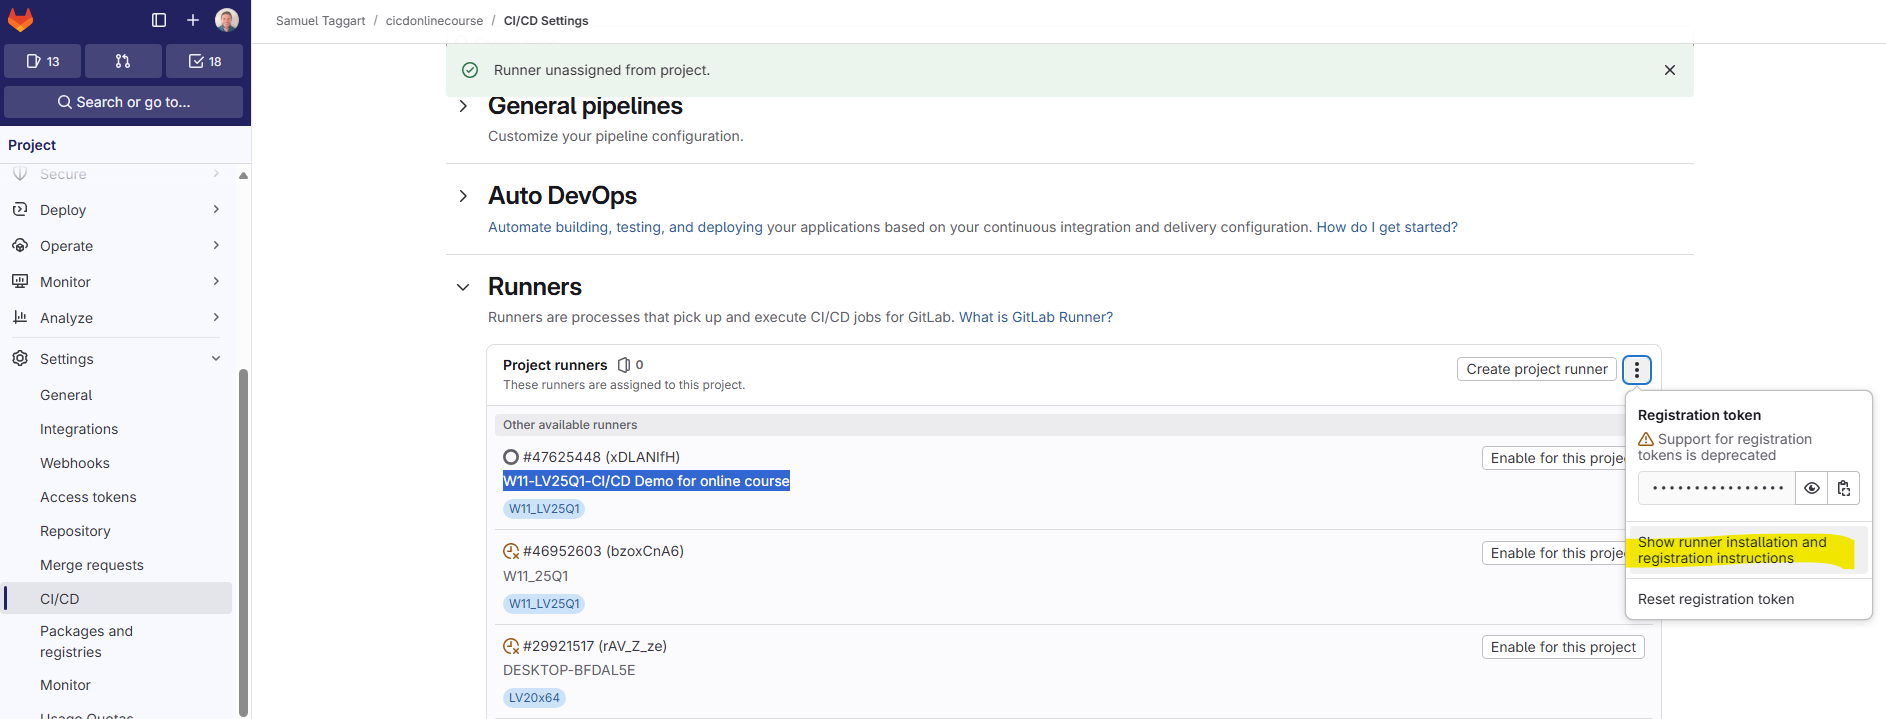
Now, go To the CI\CD settings Page for your project. Goto the Runners section and click on the 3 dots next to the "Create project Runner" button to open a menu. Select "Show runner installation and registration instructions".
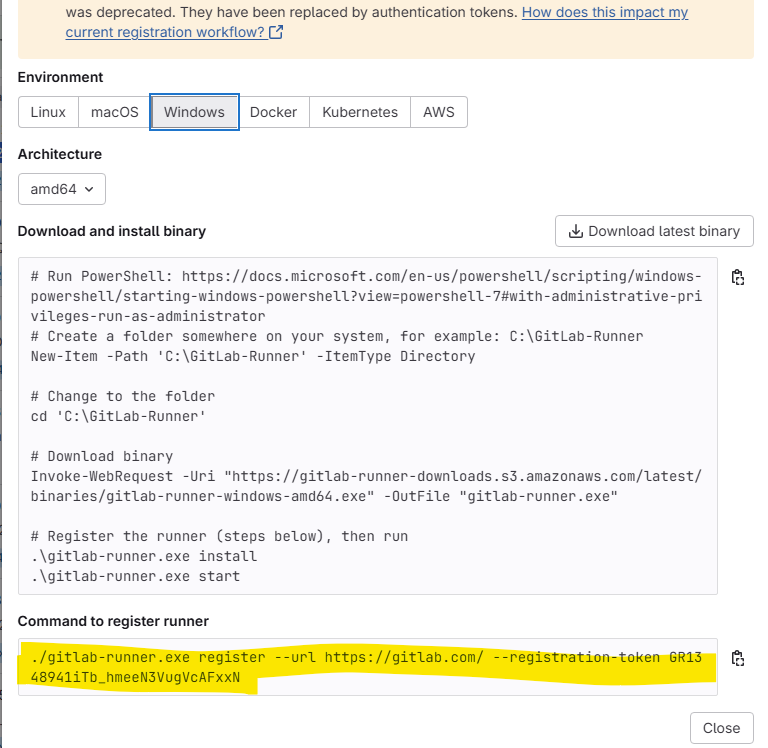
The select Windows, scroll to the bottom and copy the text in the "Command to Register Runner" text box. Launch Powershell as admin - Click the Windows button. Search for Powershell. There should be a launch as admin button on the right. Click that. Then type in cd C:\gitlab-runner to switch to the gitlab runner directory. Then paste what you copied earlier and hit enter.
Follow the prompts and enter the requested values. If there is something in square brackets [] then that is the default and hitting enter just accepts it. Do that for the key and anywhere else it makes sense. Make sure you select shell as your executor when it asks.
It will also ask you to give it a name and assign a tag to it. You can change these later through the web interface. Generally you'll want to tag a runner either with the name of a specifc project or based on the software versions installed. The tags are used to determine what jobs GitLab can run on this particular runner. You should just follow the instructions up until the point where it tells you to install it as a service. If you want to be able to actively debug and watch what is going on, you don't want to do this. So stop after step 5 and don't proceed to step 6.
Setting up GitLab Runner to use Git Bash Instead of PowerShell
NOTE: This section describes how to set up GitLab Runner to use Git Bash. If you want to use PowerShell you can skip this.
First, we need to help GitLab Runner find GitBash. Add a bash.cmd file into your user directory (the user that runs the GitLab Runner) with the following contents:
@"C:\Program Files\Git\usr\bin\bash.exe" -l
Next, we have to make sure that our starting paths are set up correctly with Linux-style formatting. In your config.toml file for your GitLab runner (it’s in the directory where you installed GitLab Runner), change the shell to bash and add Linux style paths for the builds_dir and cache_dir. That’s it. See the example below.
[[runners]]
  name = "windows"
  url = "https://your.server.name"
  token = "YOUR_SECRET_TOKEN"
  executor = "shell"
  shell = "bash"
  builds_dir="/c/gitlab-runner/builds/"
  cache_dir="/c/gitlab-runner/cache/"
NOTE on Paths: We are using linux paths here, but when passing paths as parameters to the g-cli tools (ie the parameters after the -- ) you will need to use Windows Paths.
Running as a User
Create a batch file with the following line in it.
"C:\Program Files\Git\bin\sh.exe" --login -i -c "cd /c/Gitlab-Runner && ./gitlab-runner.exe run"
Save it somewhere convenient, like the Desktop and give it a meaningful name like "Start GitLab Runner.bat" Running this batch file will open a console window as seen below. Once a job starts, then you’ll see all the windows that it opens. You’ll see the LabVIEW splash screen and any VIs it opens. So if it hangs on some dialog, you will know about it.
Set to run at Startup
In order to run the script at startup (when the current user logs in), drop a link to into the Windows Startup Folder. You can find the Windows startup folder by hitting the windows key + R and typing shell:startup into the resulting dialog box.
Setting User to Autologon
The last thing I typically do is set the user to autologon, otherwise every time the machine boots up, you have to login to the machine before gitlab-runner can start. The way to do that in windows is to use netplwiz. Hit windows key + R and type in netplwiz. It will open a User Accounts window. You should see a checkbox at the top that says "Users must enter a user name and password to use this computer." Simply uncheck it.
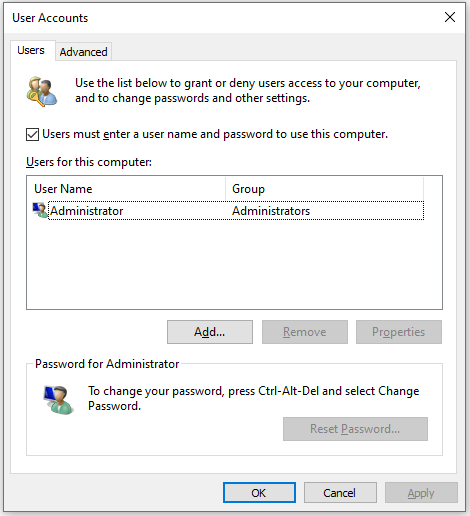
NOTE: You may not see that checkbox. If you don't you can try adding a registry key. Copy the code below. Open a command prompt as administrator. Paste and run the code. Reboot. The box should show up now. If not, there are some other potential fixes, just google it.
reg ADD “HKLM\SOFTWARE\Microsoft\Windows NT\CurrentVersion\PasswordLess\Device” /v DevicePasswordLessBuildVersion /t REG_DWORD /d 0 /f
At this point I usually reboot the runner and just sit and watch to make sure when it boots up it doesn't hang waiting for a Windows password and that the batch script runs on startup.
Verifying in GitLab
Verifying the Connection
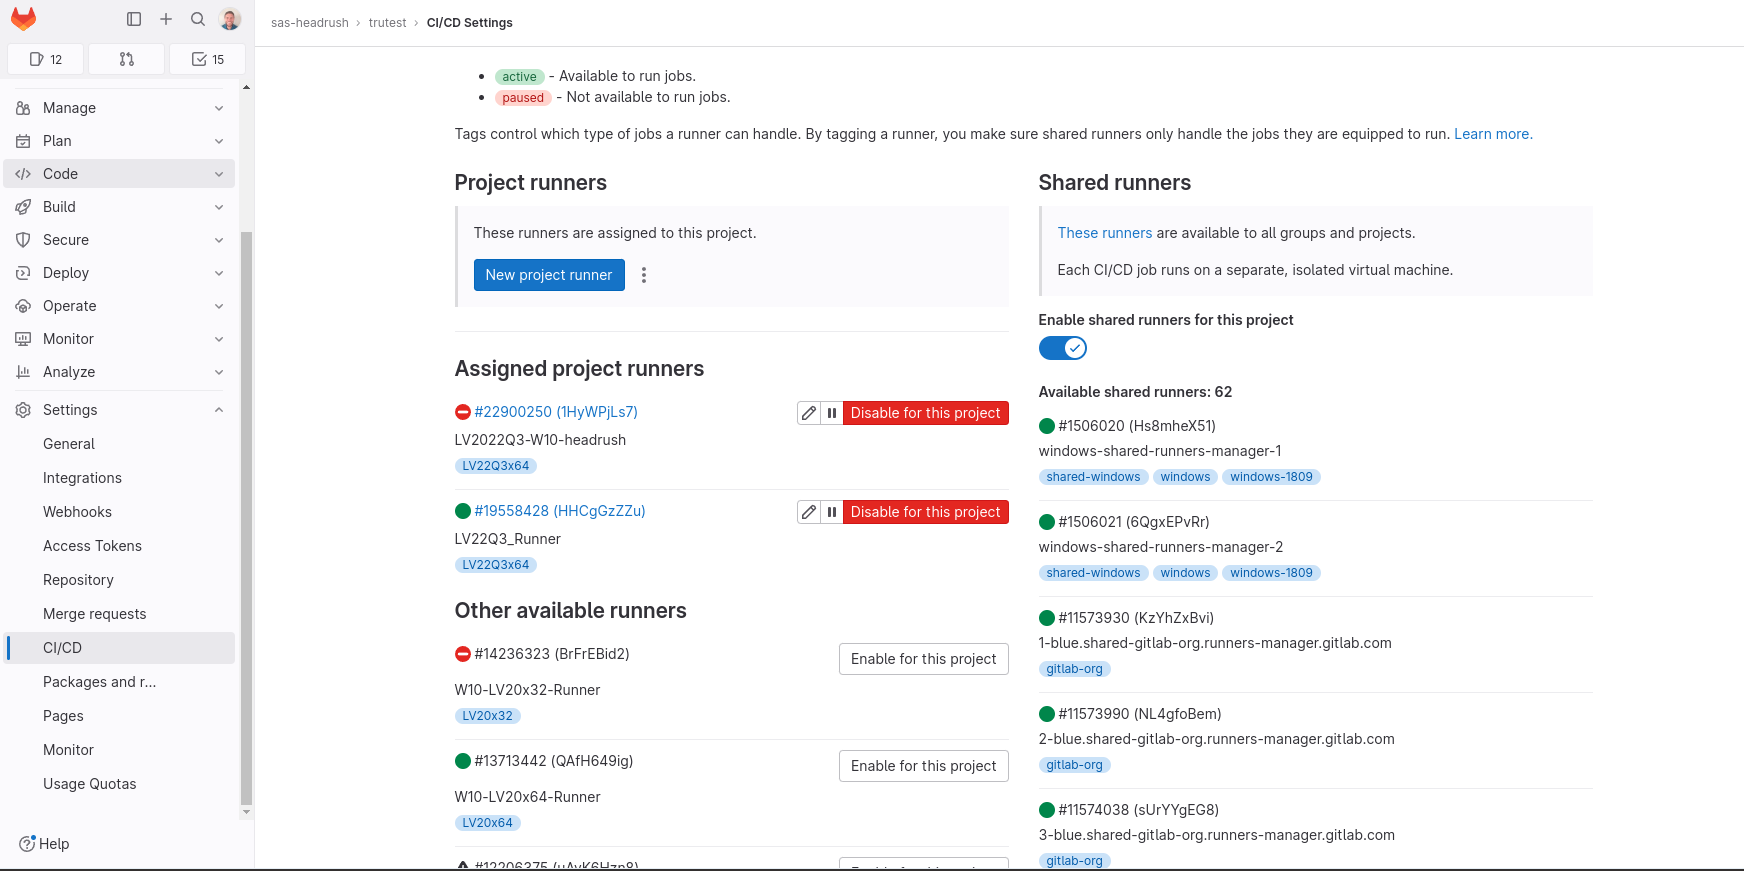
If you log into your project and go to the CI/CD settings and the runner is up and running (ie you have ran the batch file we created), you should see it in the list of assigned runners.
 ]
]
Assigning Runners and changing tags
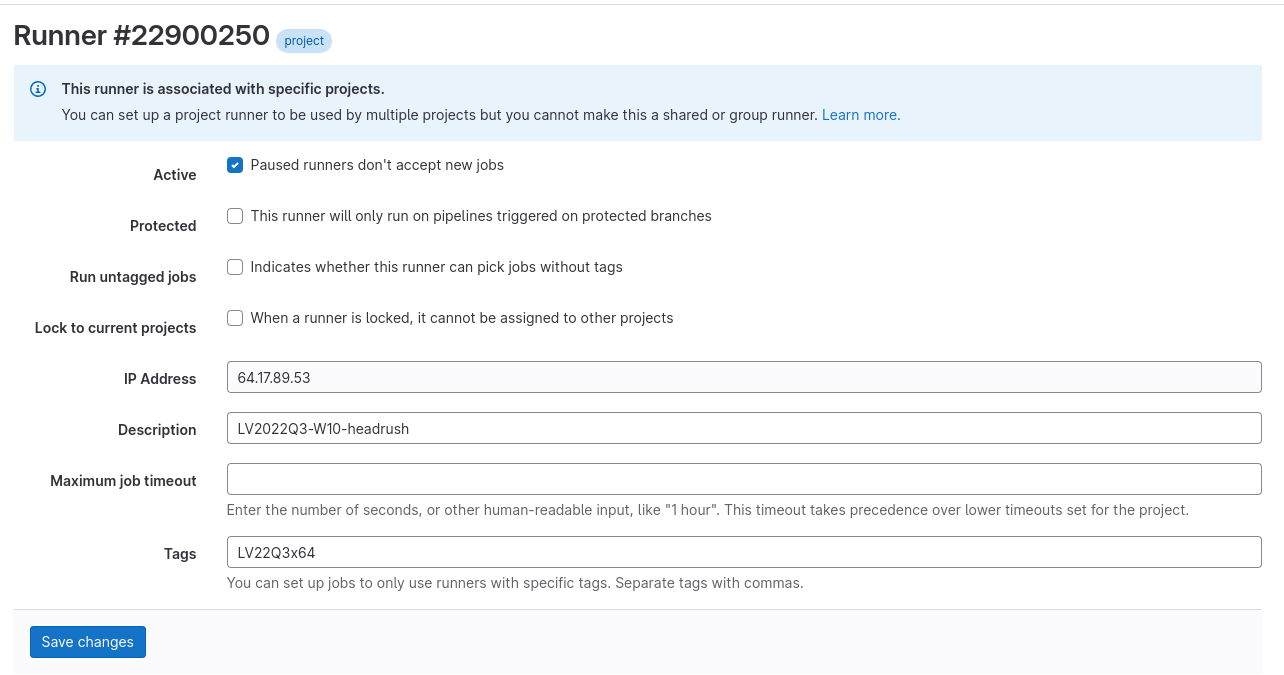
Once you have a runner up and connected to your gitlab server, it is easy to make changes to it through the web interface. You can change the name and the tags. You can also enable it for different projects (by default they are locked to a specific project, so you have to unlock it first). You can do all this by clicking on the edit button next to the runner to open the runner configuration editor.
Success!
Once you have done all the above steps, your runner should be good to go.